Topics

Blogger Tips and TricksLatest Tips And TricksBlogger Tricks

Saturday, July 28, 2012

Cheapest Linux Web Hosting in 400 Rupees Per Year in Pakistan

Are you sick of from dummy web hosting services with huge price but tiny disk space and low bandwidth, but you want to run your wordpress blog at lowest budget, this is good news for those who have very low budget but they want Linux Web Hosting with Php my admin, Mysql facilities and cpanel facilities, You can now host your domain in just 400 Pakistani Rupees , please do contact with Mr Atif at 0324 5604834
www.zaftech.ca
http://cheapest-web-hosting-in-pakistan.blogspot.com/ 

Cheapest Wordpress Web Hosting In Pakistan 400 RS Per Year

You can now host your Wordpress Blog at just 400 Pakistani Rupees , Full Cpanel Access, with Php My admin, Mysql databases,Wordpress Softwares, 24 Hours Technical Support.You can also get website designing in just 1000 Pak Rupees, For further details please contact at 0324 5604834
Real Cheapest Web Hosting In Pakistan, No Hidden charges or additional service charges
This is real Offer for Real People.Good News for those who have low budget but they want to earn money from their Wordpress Blog
www.zaftech.ca

Wordpress Web Hosting in 400 Rupees in Pakistan

This is good news for blogger in Pakistan, Now Wordpress Web hosting with Cpanel Access, Php My admin, Mysql databases, is available in Pakistan.This is new Excited pacakge in pakistan,No one can give such lowest Web hosting Rates in Pakistan, In this you will get 24 Hours Technical Support,Backup facility,Fantisco,and lot of other latest Applications.You can contact for Cheapest Web Hosting for Your word Press Blog in pakistan at 0324 5604834 Atif
Lowest Web Hosting www.zaftech.ca 
http://cheapest-web-hosting-in-pakistan.blogspot.com/  

orbitgoogle.com

Tuesday, July 3, 2012

Setup a GoDaddy Domain with Your Site

The custom domain name feature allows you to setup your Weebly site with a domain name you've already registered through GoDaddy. The changes we request are simple, but it can be a rather frustrating task if you don't have any experience with editing your domain records.  We recommend that you register your domain through Weebly if you are looking to buy a new domain.

Login to GoDaddy and select the domain you want to use with your site.  
Picture
Launch the DNS Manager. 
Picture
You'll see a whole mess of settings on the next page.  But you only need to change two records.  First change the "@" record at the very top.  Click the pen / paper icon to edit it.  
Picture
Enter our 199.34.228.100 IP Address in the provided box.  Then click OK.  
Picture
Then make sure the "www" CNAME record is pointed to @.  
Picture
It can take GoDaddy up to 24 hours to update their records with your change (though it usually only takes a few).  Nothing is happening on our end when you point a domain here so there is nothing we can do to speed this up.

The only thing you need to do in our system is make sure you've assigned the domain to your site and Published it.  Go here to learn how to do that.

Android: Setting up Email

We know you're excited to get your email set up on your Android®. We should have your email working on your device in about 5 minutes. These steps work for most of our customers, but sometimes you might need to make some additional changes depending on where you live and which ISP(s) you use.
If you follow the steps below, and you can't receive or send email, please see Android: Troubleshooting Email for help.
BEFORE YOU START: To set up Android with your email, you need to know your POP or IMAP Email Server Settings and ports. To find them, go to the InfoCenter and write down the information that displays under Email Server Settings.
NOTE: The steps to set up email on your Android device might be a little different depending on your make/model and your network provider. However, all the information you need to set up your account (username, password, server settings) is in these steps.

To Set up Email on Your Android-based Device

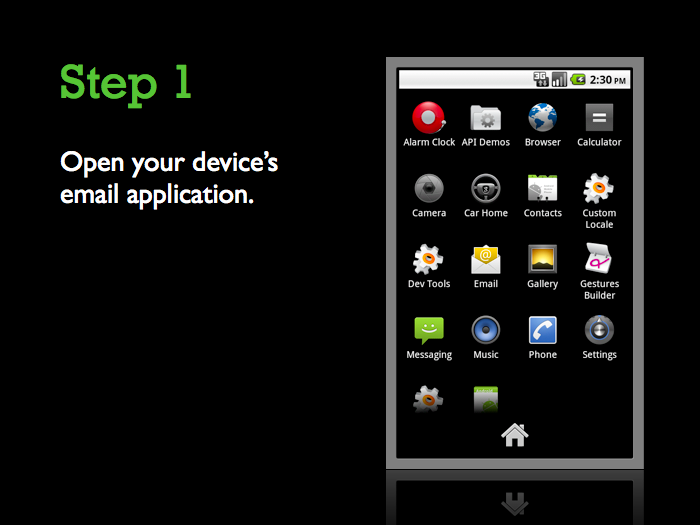
  1. Open your device's email application.
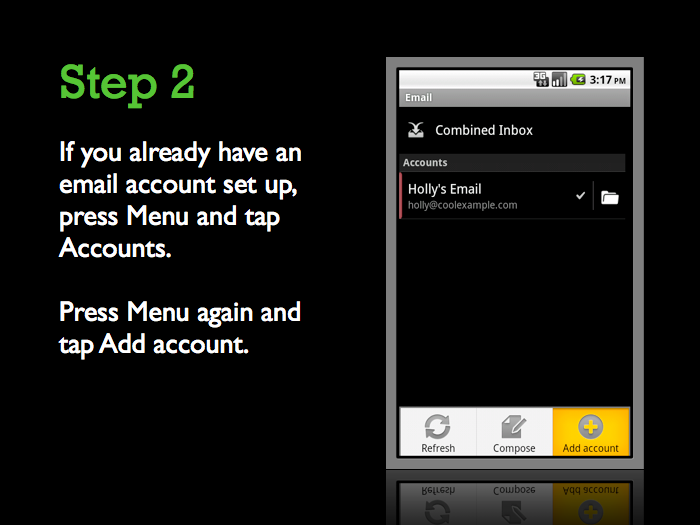
  2. If you already have an email account set up, press Menu and tap Accounts. Press Menu again and tap Add account.
  3. Type your Email address and Password, and click Next.
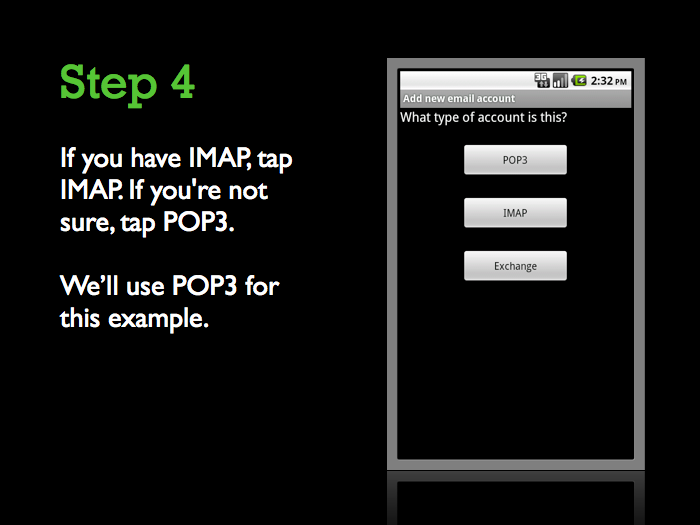
  4. If you have IMAP, tap IMAP. If you're not sure, tap POP3.
  5. Use these settings for your incoming server, depending on the type of email you have:
    POP3
    UsernameEnter your full email address.
    PasswordEnter your email account password.
    POP3 serverpop.secureserver.net
    Port110
    IMAP
    UsernameEnter your full email address.
    PasswordEnter your email account password.
    IMAP serverimap.secureserver.net
    Port143
  6. Use these settings for your outgoing server:
    SMTP (Outgoing Mail Server)
    SMTP serversmtpout.secureserver.net
    Port80
    Security typeNone
  7. Select Require sign-in and make sure your Username (your full email address) and Password are correct. Tap Next.
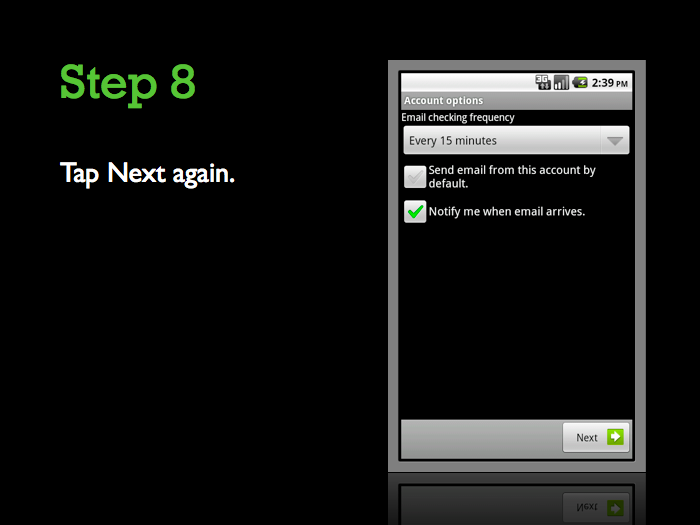
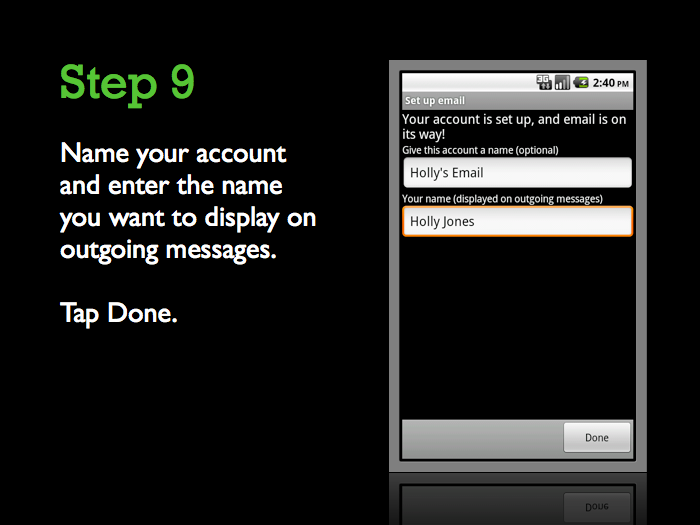
  8. Tap Next again. Name your account and enter the name you want to display on outgoing messages.
  9. Tap Done.
That's it. If everything is working OK, you should see some email messages. To make sure you can send messages, go ahead and compose an email and send it to yourself.
If you're not receiving email messages or you can't send messages, see Android: Troubleshooting Email. Don't worry. There are a few things that can happen during the setup process. We'll help you investigate and fix them.

Outlook 2007: Setting up Email

We know you're excited to get your email set up on your computer. We offer a variety of ways to help you through this process below: written step-by-step instructions, a screen-by-screen walk through, a video that shows you the whole process, or the Outlook Setup tool that does everything for you automatically. Ideally, 5 minutes is all you need to get your email working in Outlook 2007.
BEFORE YOU START: To set up Outlook with your email, you need to know your POP or IMAP Email Server Settings and ports. To find them, go to the InfoCenter and write down the information that displays under Email Server Settings.
If you're not receiving email messages or you can't send messages, see Outlook 2007: Troubleshooting. Don't worry. There are a few things that can happen during the setup process. We'll help you investigate and fix them.

Setting up Your Email Address with POP

You can always use Web-Based Email to send and receive email messages. Post Office Protocol (POP) lets you retrieve email from a remote server through an email client.
BEFORE YOU START: To set up your email client with your email, you need to know your POP or IMAP Email Server Settings and ports. To find them, go to the InfoCenter and write down the information that displays under Email Server Settings.

To Configure POP for Your Email Account

  1. Create an account with your email client.
  2. In the client for which you want to configure POP, locate the POP settings and enter the following:
    Username
    Your full email address
    Password
    Your email account password
    Incoming Mail Server
    Your incoming server.
    Outgoing Mail Server
    Your outgoing server.
    Incoming Port
    Without SSL - 110 With SSL - 995
    Outgoing Port
    Without SSL - one of the following 25, 80, 3535 With SSL - 465
     
     
    Godaddy.com